Matter365 is designed to make your workday easier. Our goal is to enable you to spend less time on administrative tasks and more on billable activity or othe
r
priorities
. The Matter365 platform is built
on
Microsoft 365
(formerly Office 365)
and leverages all the power and security you would expect from the Office Suite and Microsoft Azure. So, you get the advantages of Microsoft but with a Matter-centric v
iew
with
some
additional
features like time tracking
, billing, and trust accounting,
that enables you to
manage all of your law firm’s needs
. It’s like
Microsoft 365
if it were built for law firms.
Groups – a brief introduction
Matter365 creates the Matter-centric organization of your Microsoft 365 account using
Microsoft Groups. When you create a new Matter in Matter365, we create a new SharePoint Group and the Owners and Members of that Matters will be members of that Group.
The Groups allow Matter365 to keep all data in your various Microsoft 365 Applications linked to each other and associated with your Matters:
- Outlook Group inbox (for sharing/storing emails for the Matter).
- Outlook Group Calendar (showing appointments for the Matter in a different color)
- Matter specific Plan in Planner (for task management of the Matter)
- Matter specific Folder on OneDrive (for storing Matter documents)
- Matter specific Notebook on OneNote (for keeping Matter related notes and more)
The Matter specific space for each of the Microsoft Applications are accessible from each Matter’s Dashboard in the Important Links Tile. As such, you use the Matter Dashboard as the portal to all of your Matter’s data.
This guide will provide some direction on how to find some of the core features of Matter365.
Getting Started in Matter365 – Home Screen
When you log into your
Matter365 account you will see your main dashboard. It will look a little empty at first but as you start to create Matters, Tasks and time your activity it will soon start giving you some quick insights.
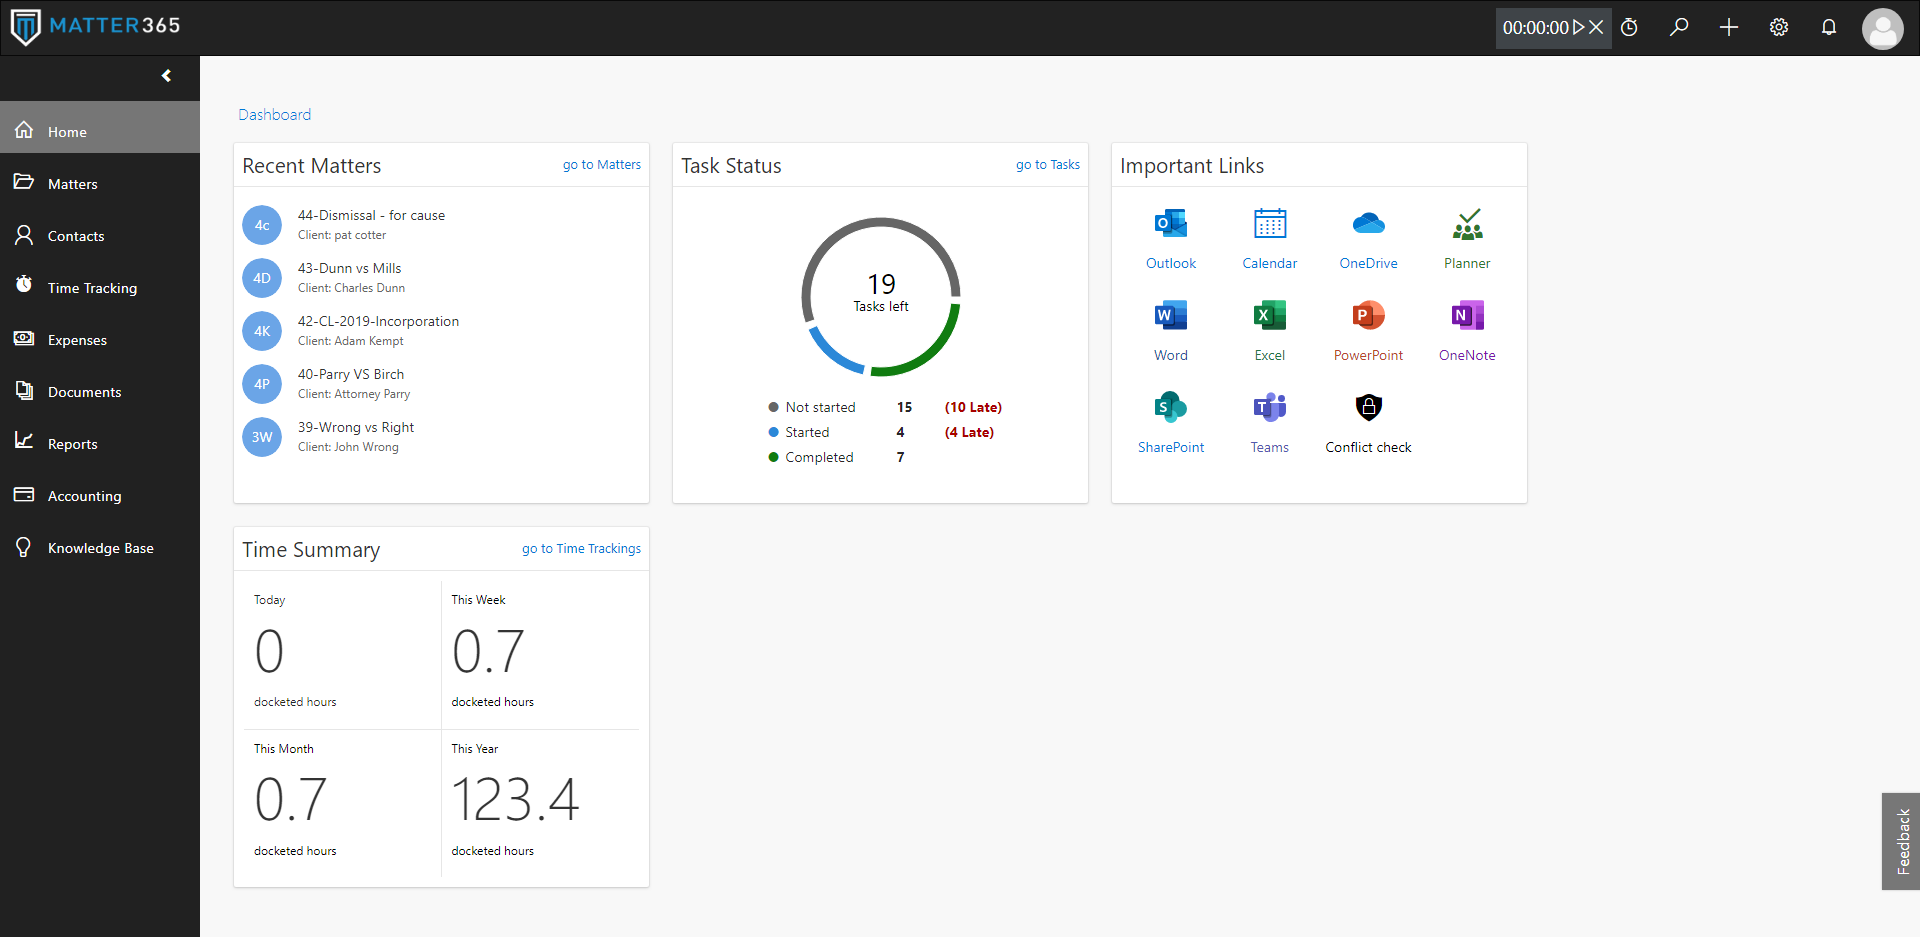 Matter365 Dashboard
Granting access to other users in your organization
If you have the Microsoft admin account, and you used it to sign up for Matter365 you will get a list of Permissions that you need to Approve so that you and everyone in your company can use Matter365. You will see that list on the first login.
You will see this message:
If you see this message, please ask your Microsoft 365 admin to try to log in with their credentials.
Your admin will be able to grant the consent for Matter365 to work with your Microsoft account, and after that, you will be able to log in and use Matter365, and add Matter365 licenses to other members of your organization.
This action will give consent to Microsoft to let Matter365 app read Microsoft 365 on behalf of other people in your company. It is a standard consent required for all third-party applications that connect to Microsoft 365.
You can use the same page to add licenses to other people from your organization.
To do this use
Add license button and select people from your company you would like to assign licenses to.
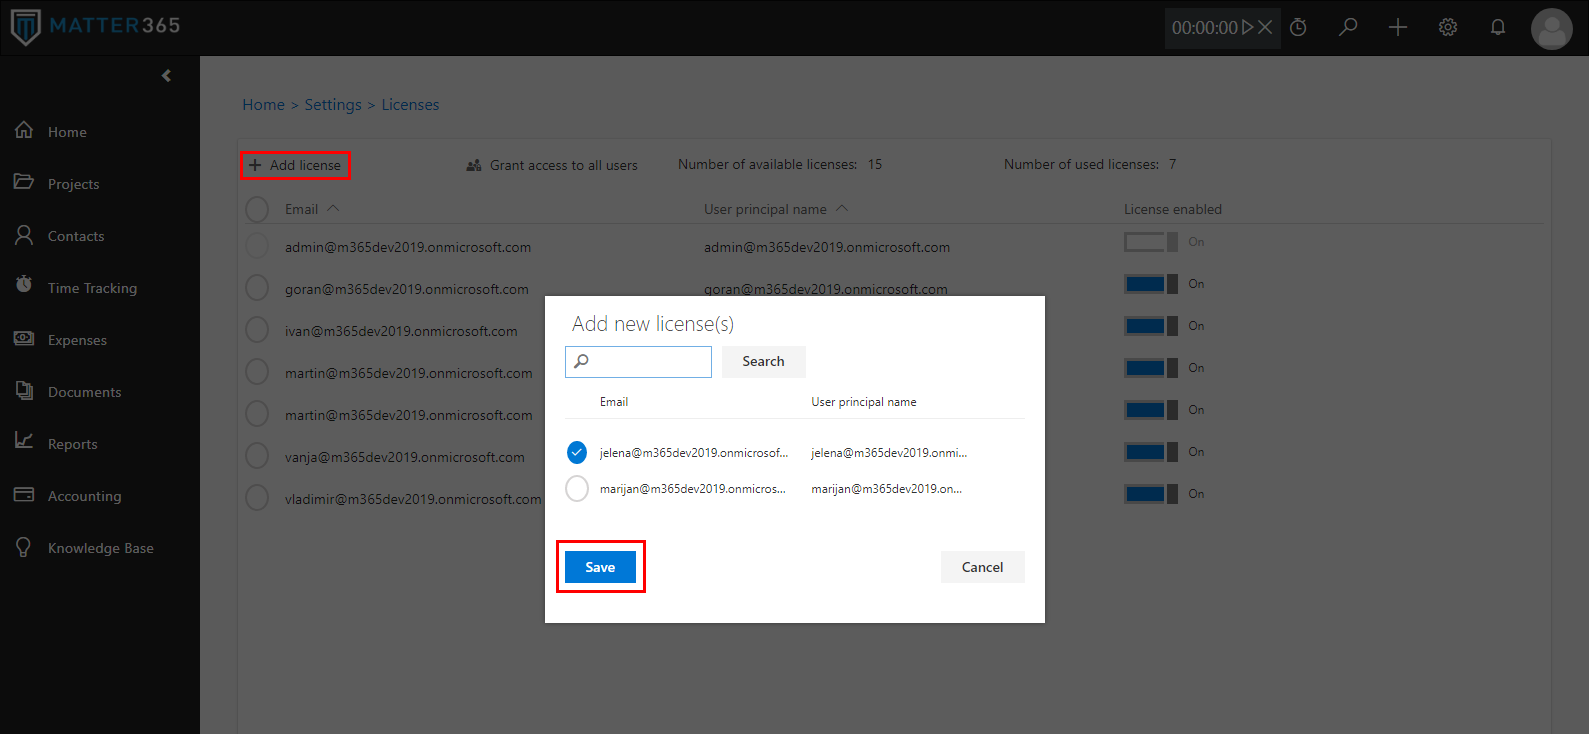 Assigning a license to another user
Make sure you have purchased enough licenses for all the users you are setting up. On this page you can see the number of available licenses, and if you need more, you can get them by visiting the Matter365 Settings > Billing Portal. Only members of your firm with active "Billing manager" permission will be able to access the billing portal. Permissions can be set in Matter365 Settings > Permissions.
Every Matter must be associated with a Client. As such, the first step in creating a Matter is adding your Clients as Contacts in Matter365.
1. Contacts > Create new contact
2. Fill out the “Create new Contact” form and save
If you have all your Clients as contacts in your Outlook, you can import them into Matter365 by following the steps outlined here:
Migrating Contacts

The character limit for a Contact is 100.
Creating new Matter
To create a new Matter, you can click on the "+" sign in the upper right-hand corner of the Matter365 app, OR click on the Matter Tab on the left-hand side and then click "Create New Matter".
1. Matters > Create new Matter
2. Fill out the “Create new Matter” form
- Client
- You must choose a client that is an existing Contact. If your client is not available in the list, you will need to create a new Contact.
- You can create a new Contact on this screen by clicking on "Create New Contact". When you save the Contact, it will be available from the drop-down list of Contacts.
- In order to save the new Matter, the client must be chosen from the drop-down list of Contacts.
- Conflict Check - To learn more about Conflict check feature, click here
- Responsible attorney – For receivables reporting purposes, we track who's responsible attorney on all matters. Responsible attorney has the same rights as any other matter owner
- Matter name – this will be your Matter name (the character limit for Matter name is 92)
- NOTE: There are some restrictions when it comes to naming your Matters, some special characters can't be used. See the full list here: Office Constraints
- NOTE: The Matter Name is NOT editable once a Matter has been created. The Matter Name is used to create folders and pages in various Office365 Applications, so once the Matter has been created, the name cannot be changed.
- Matter type and Matter source – In order to provide some business intelligence reports, you can track types and sources of your Matters, and then use that data to produce billing reports based on Matter Type or Source.
- You can learn how to personalize the Matter Types for your firm here: Matter Types
- You can learn how to personalize the Matter Sources for your firm here: Matter Sources
- Members and Owners - You can add owners or members from your firm who will be working with you on this Matter. Both Owners and Members will have full access to the Matter and all the Matter specific spaces in Microsoft 365 applications, however:
- Owners have the ability to edit the Matter's Members and their Billable Rates.
- Members can only edit their own billable rates, and
- The Responsible Lawyer will always be an Owner
- You can also invite external collaborators (Guests) to get access to Matter documents, tasks, emails.
- NOTE: If you add/invite “guests” to your Matters in Matter365 or if you add “guests” in any of the Microsoft 365 Applications (e.g. OneDrive, Planner, or OneNote) the “guests” will be added to the Group created for that Matter and will have complete access to all the Applications and data. You should therefore be careful when adding “guests”.
- The guests won't have access to the Matter365 application.
- For more information on Guests, please see: Collaborating with people from outside of your company
- You can also add related contacts to your Matters. There are those contacts that are not necessarily the client, but you need to associate them with the Matters, e.g. opposing counsel, witnesses, etc.
- NOTE: To add a related contact to your Matter you must choose a contact that is an existing Contact. If the contact is not available in the list, you will need to create a new Contact. In order to save the related contact to a Matter select the contacts from the drop-down list of Contacts.
- You can learn how to personalize the Contact Types here: Contact Types
You can also add
Custom Fields for your Matters.
Custom Fields allow you to gather and store additional information about your Matters in predetermined categories. When created, Custom Fields will be included in Create new Matter window, but aren't required to open a Matter:
To learn
how to create and use Custom Fields click here:
Custom Fields
Continue Matter Set-up
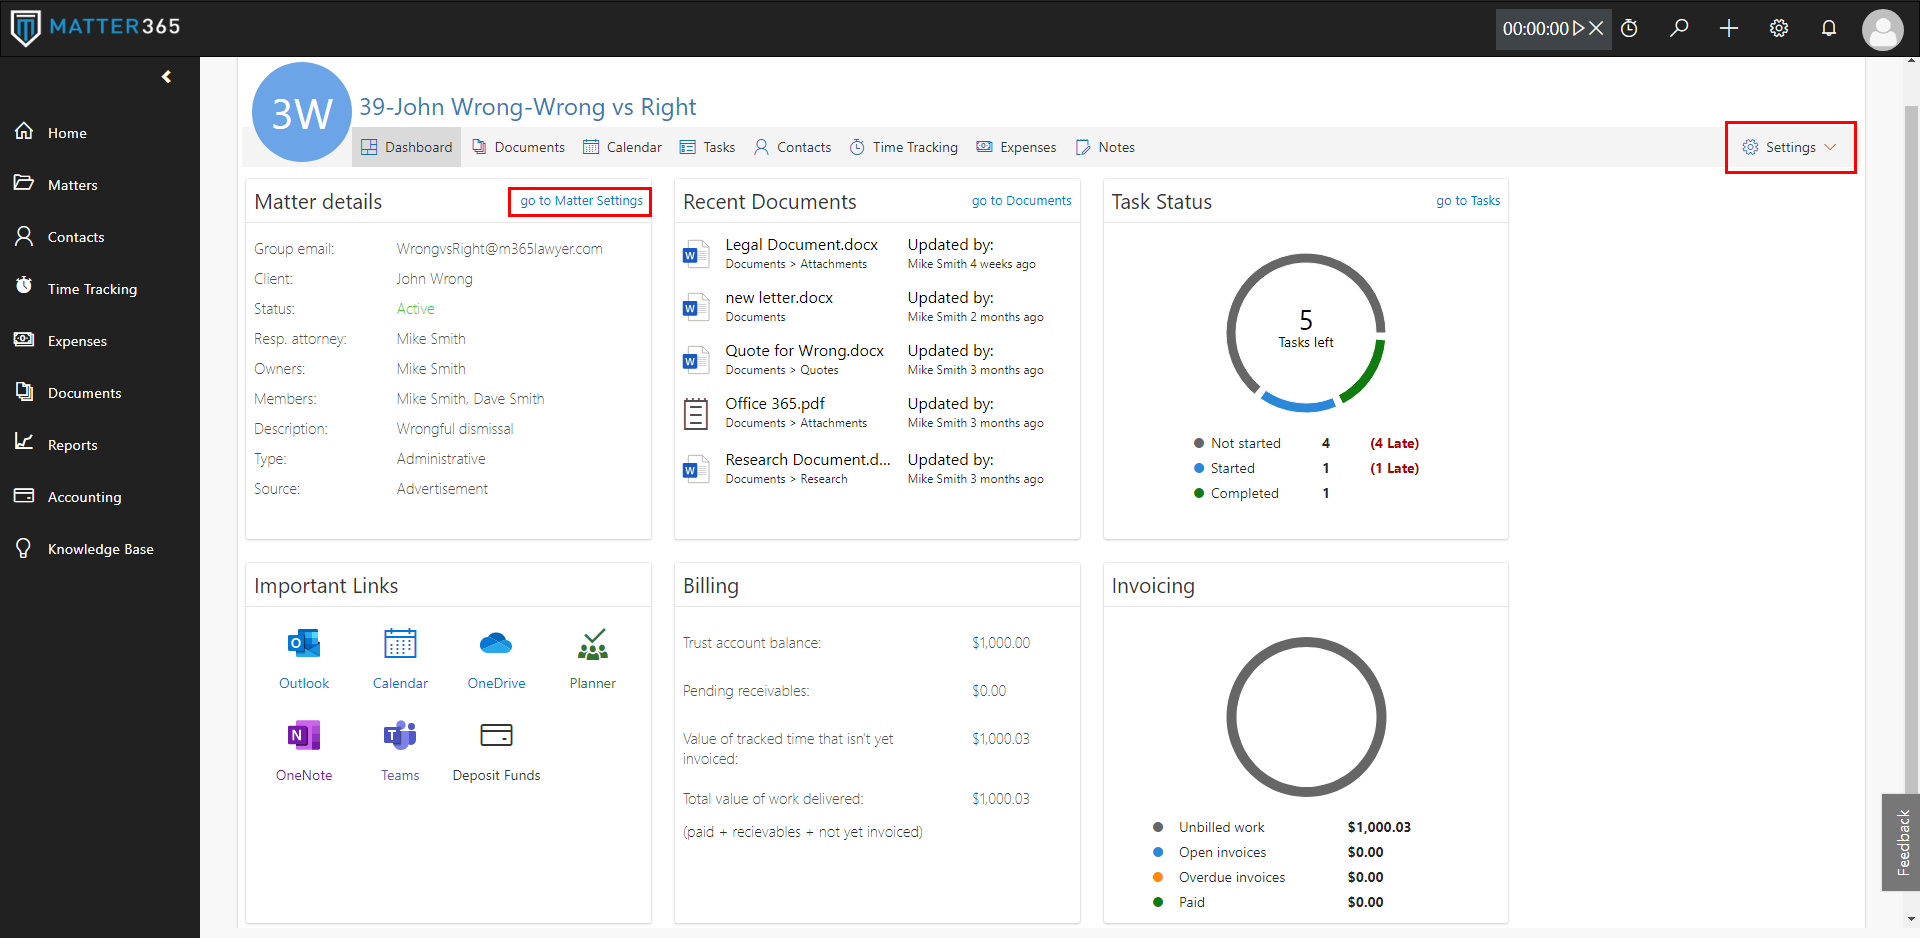 Matter dashboard view
Matters > click on your new Matter >
go to Matter Settings or use
gear icon.
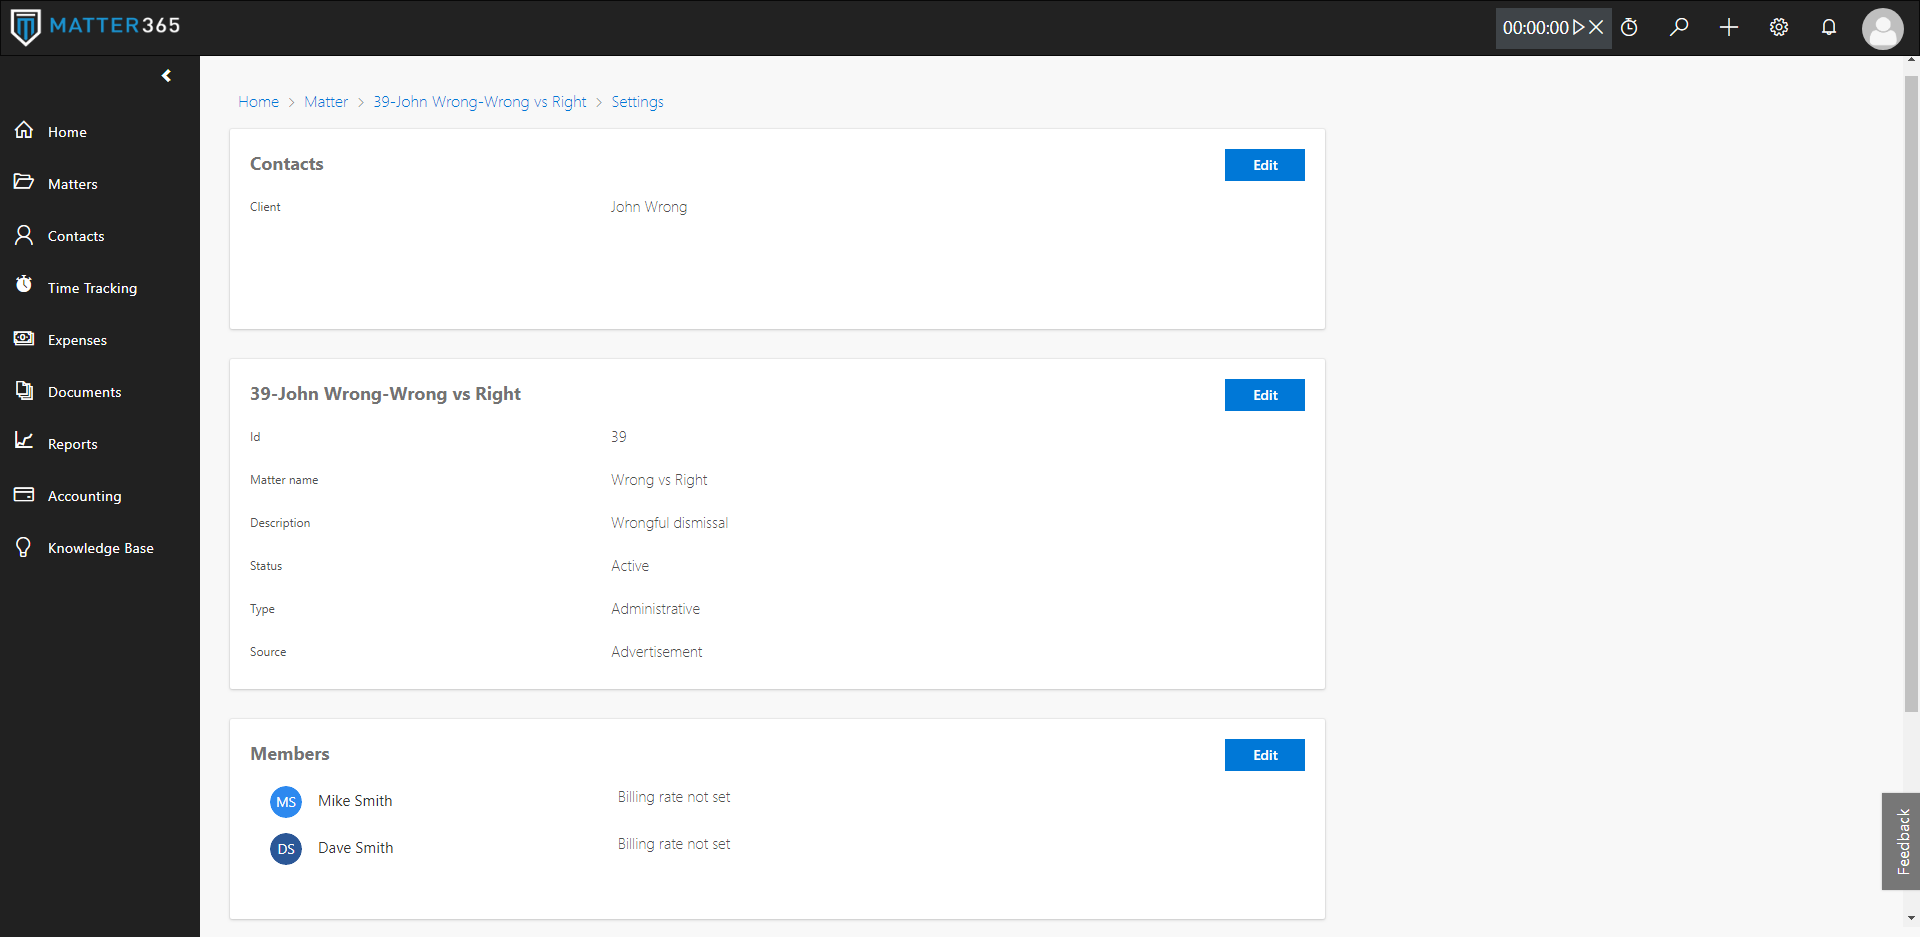 Matter settings page
To set a default hourly rate for this Matter, or to add or remove members, click on "Edit" in the Members tile.
To add more related contacts click on "Edit" in the Contacts tile.
To change or edit the Matter Description, Matter Type, or Matter Source, click on "Edit" in the Matter Details tile.
Time Tracking
Now that the Matter is set up any time spent on activities can be associated with the Matter. At the top of the screen is a clock with a timer.
 Time tracking timer
1. Click on the
play
(►)
button to start the clock.
2. Click on
pause II when you want to stop the timer and associate your time with a Matter in the pop-up window:
- Select a Matter from the drop-down
- If you set up a default Billing, it will appear in the dialog or you can add billing rate on the spot
- Select a litigation code from a list, or enter a custom one (this field can be left blank if desired)
- Add a description of the activity
- Click "Save"
For Fixed Fee Billing, in the time tracking pop-up window, you can adjust the time to one Hour, and then edit the Billing Rate to the amount of your fixed fee. When you bill this time entry, it will bill one unit of your Fixed Fee amount.
Review your time spent on the Matter
From Matter Dashboard, select
Time Tracking to see all-time entries on that Matter, or Matter
Expenses to see all the expenses.
Invoice for your time spent on a Matter
In order to use the Invoicing feature of Matter365, you will need to have a QuickBooks Online account. To see how to connect Matter365 to your QuickBooks Online account, please see:
QuickBooks Online Integration.
For a more detailed explanation of Invoicing, please see:
Invoicing
If you have QuickBooks set up with Matter365 - click on
Create invoice button at the top of the page.
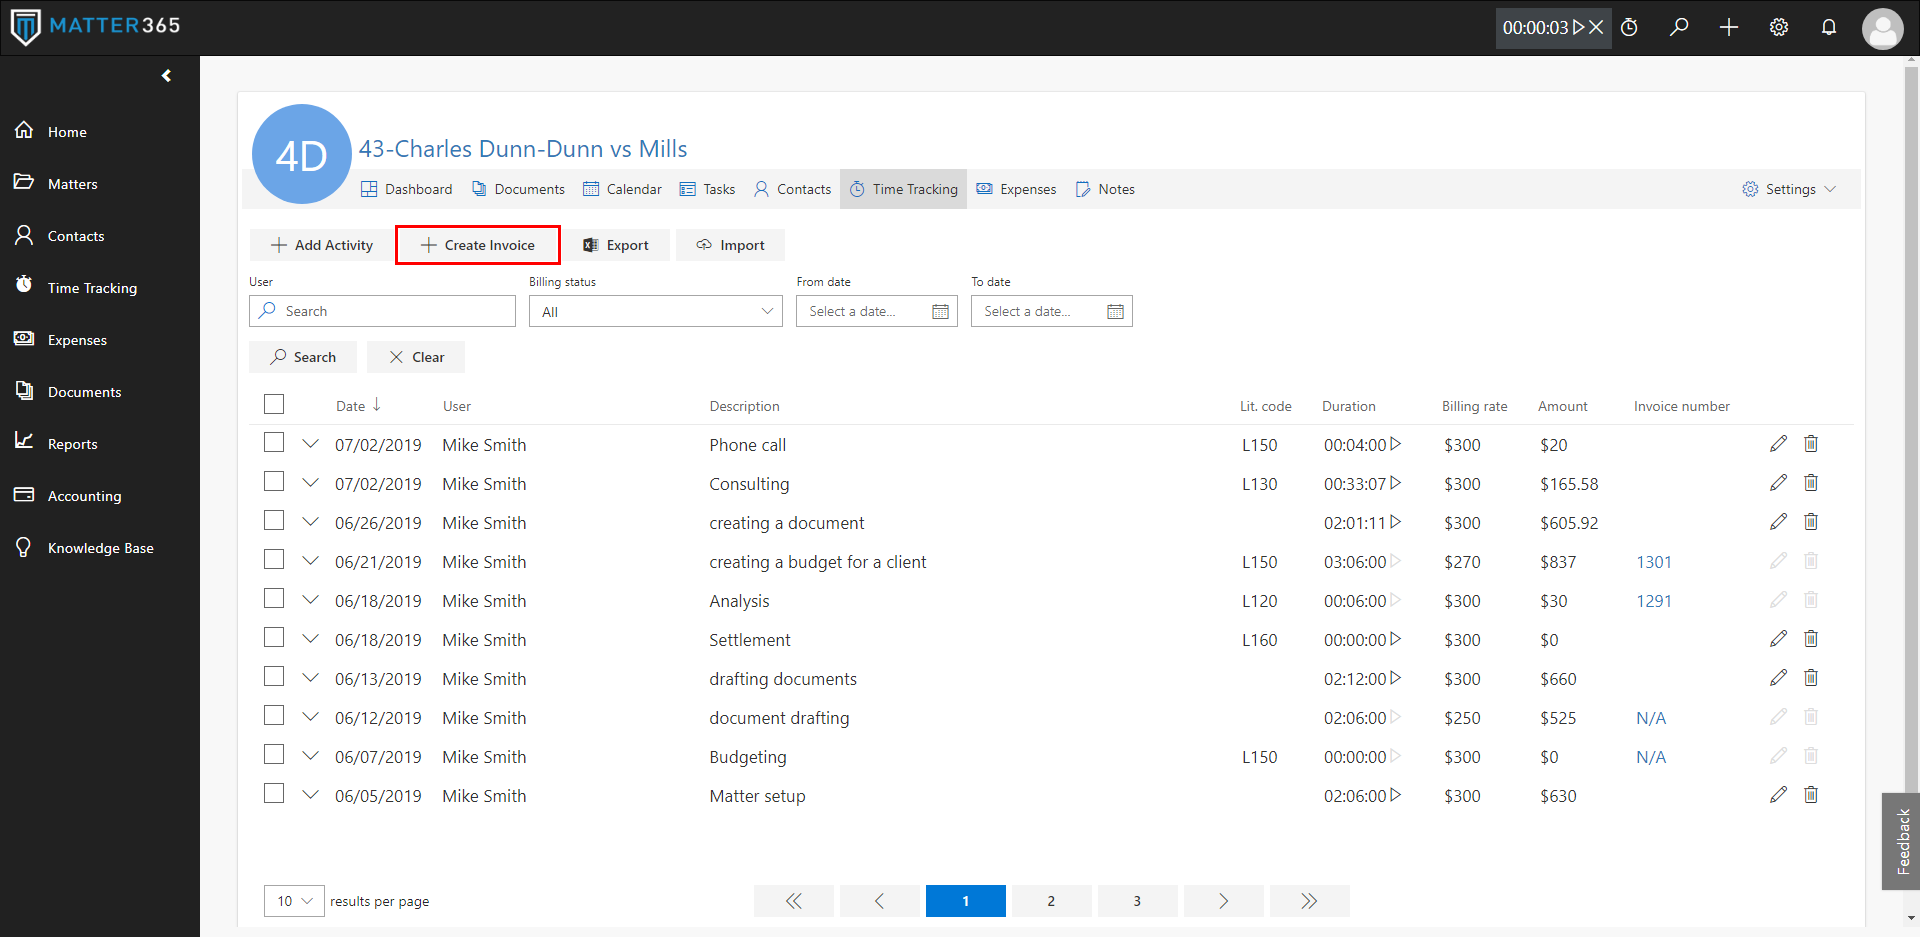 Create QuickBooks Online invoice in Matter365
If you're not using QuickBooks Online, and you don't plan to, you can also export your Time entries and/or Expenses entries to a CSV file.
1. Go to the Time Tracking Tab
2. You can filter the Time Tracking entries according to your needs by using the Search fields:
- Matters
- Responsible Attorney, and
- Date Range
3. Select the Time entries that you want to export by clicking the box(es) on the left, or select all by clicking the box at the top of the screen.
4.
NOTE: only those time entries shown on this screen will be exported. If there are multiple pages (as shown on the bottom of the screen) you will want to increase the number of results per page (bottom left) so that all the required entries are on a single page.
5. Click "Export" located at the top of the page, and select comma separated values (for Excel) then click "Export" again.
You can use these exported time entries to import into your billing/accounting system.
Documents
The Document Tab will display the Document.
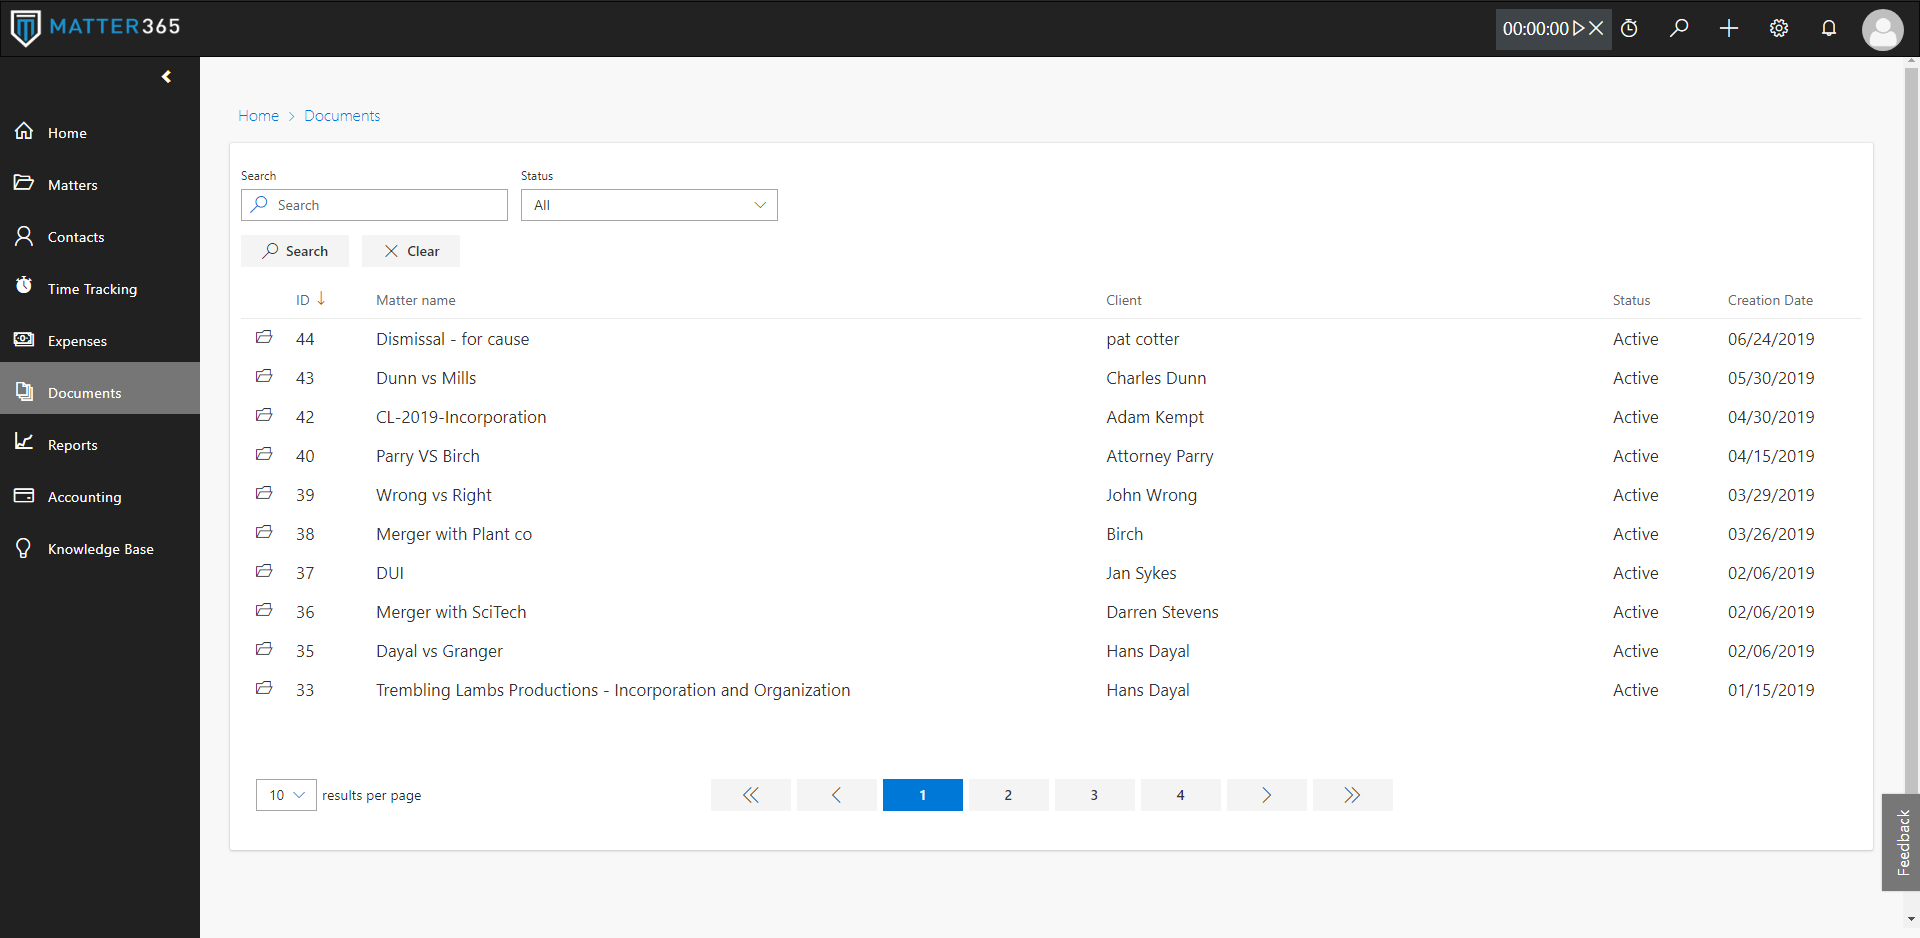 Documents page
When you select a Matter, all of your documents for that Matter will be shown.
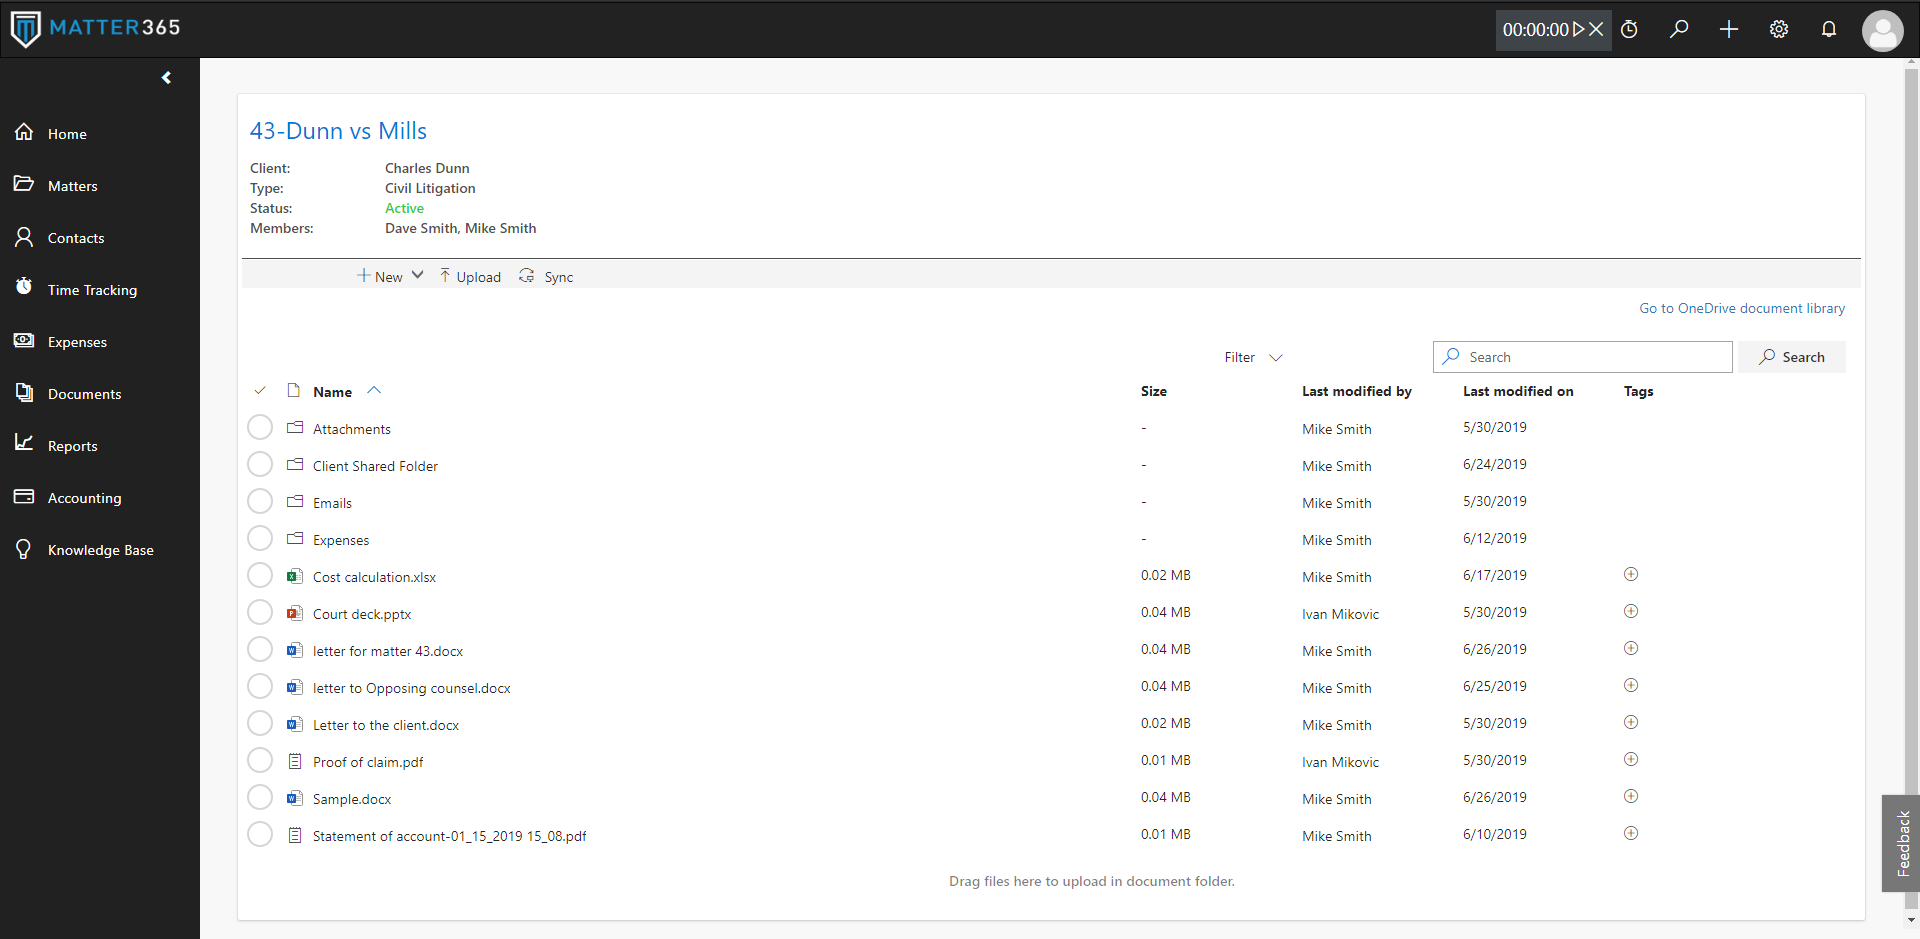 Documents page for a specific Matter
You can also search your documents from the Document Tab. The search function includes both Document names as well as full-text searches within the documents. The search results will be organized by Matter Folder.
Create a Document within Matter365
We recommend that you use the Matter Dashboard as the portal for the creation of Documents, as you will be assured that you create and save them in the correct Matter.
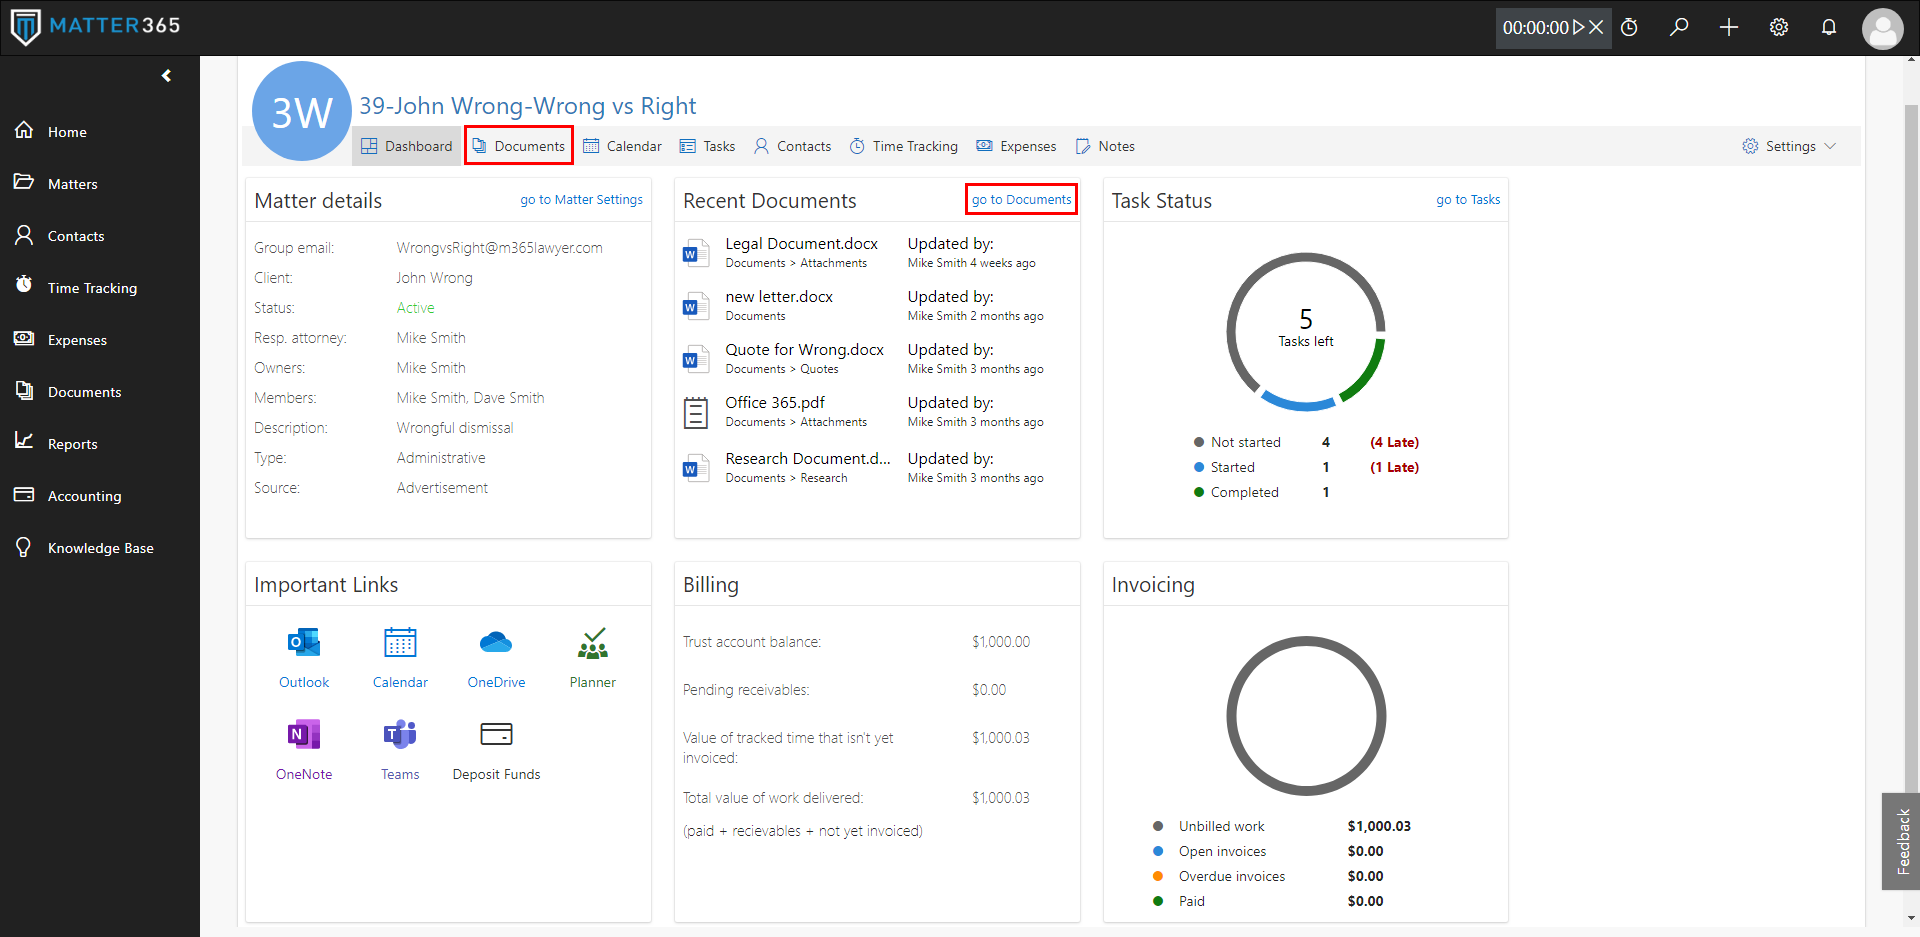 Accessing Matter documents through Matter dashboard
Clicking on
go to Documents link, or
Documents menu item will lead you to documents page for that Matter.
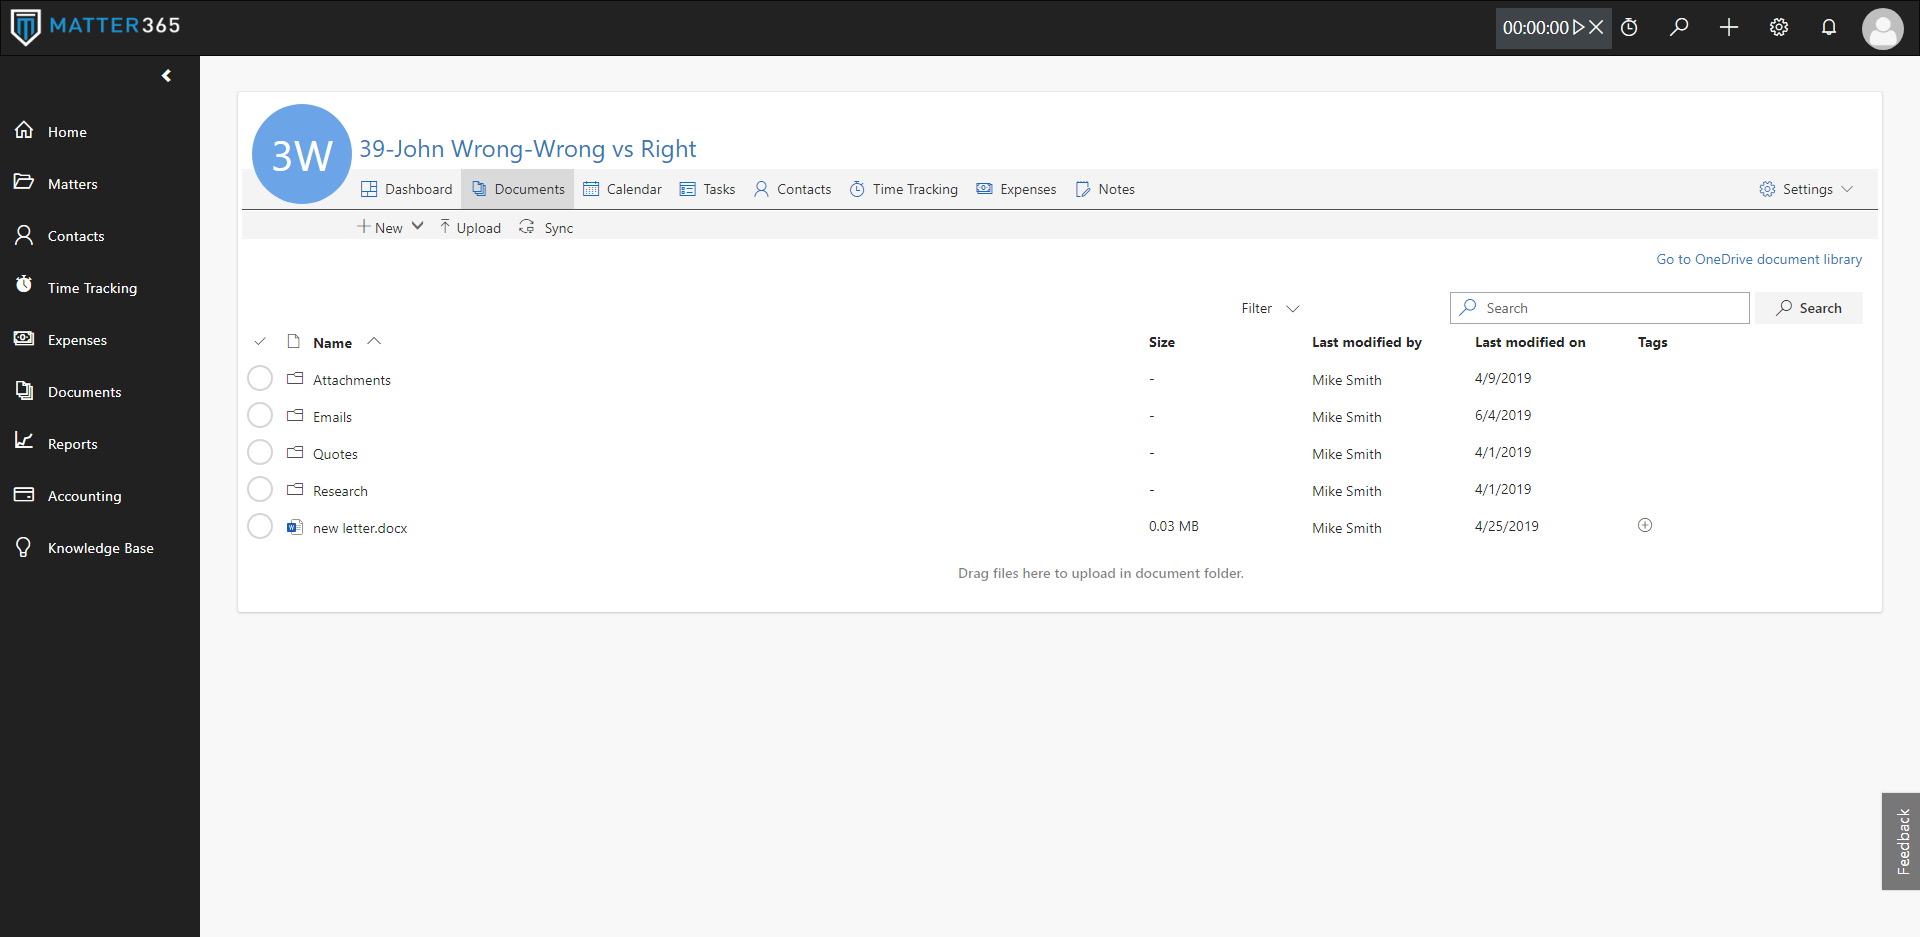 Matter documents page
From here you can create a new document by clicking on "
New" in the upper left-hand side and clicking on the type of document. After you enter the Document name, it will be saved into the Matter and displayed in the Document list.
You can then "
Select" that document (clicking the circle to the left of the Document) and a new menu of options will appear enabling you to Open, Download, Rename, etc.
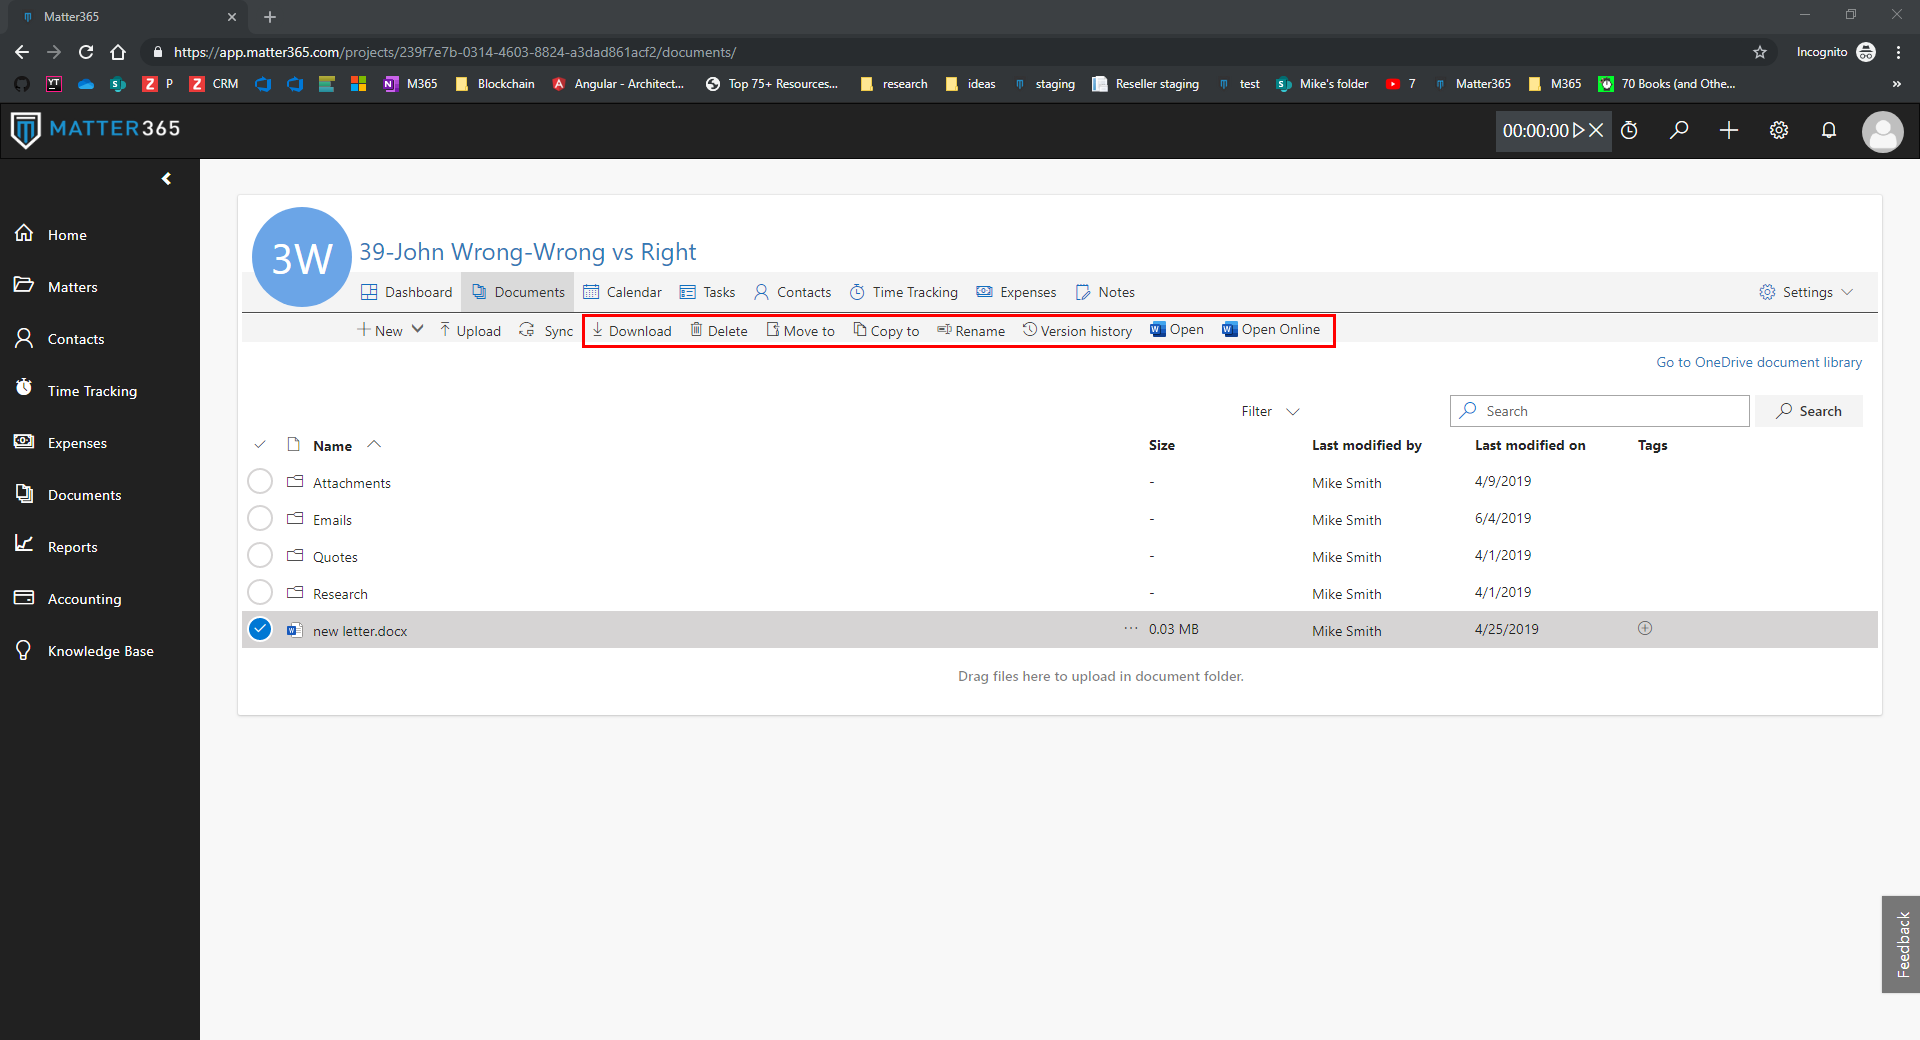 Document options
Your document will be automatically stored in Matter's Document repository where it is accessible by other Members of the Matter.
Syncing documents with your desktop
To sync your Matter documents with your desktop, you need to open a Matter Documents page and click the
Sync button.
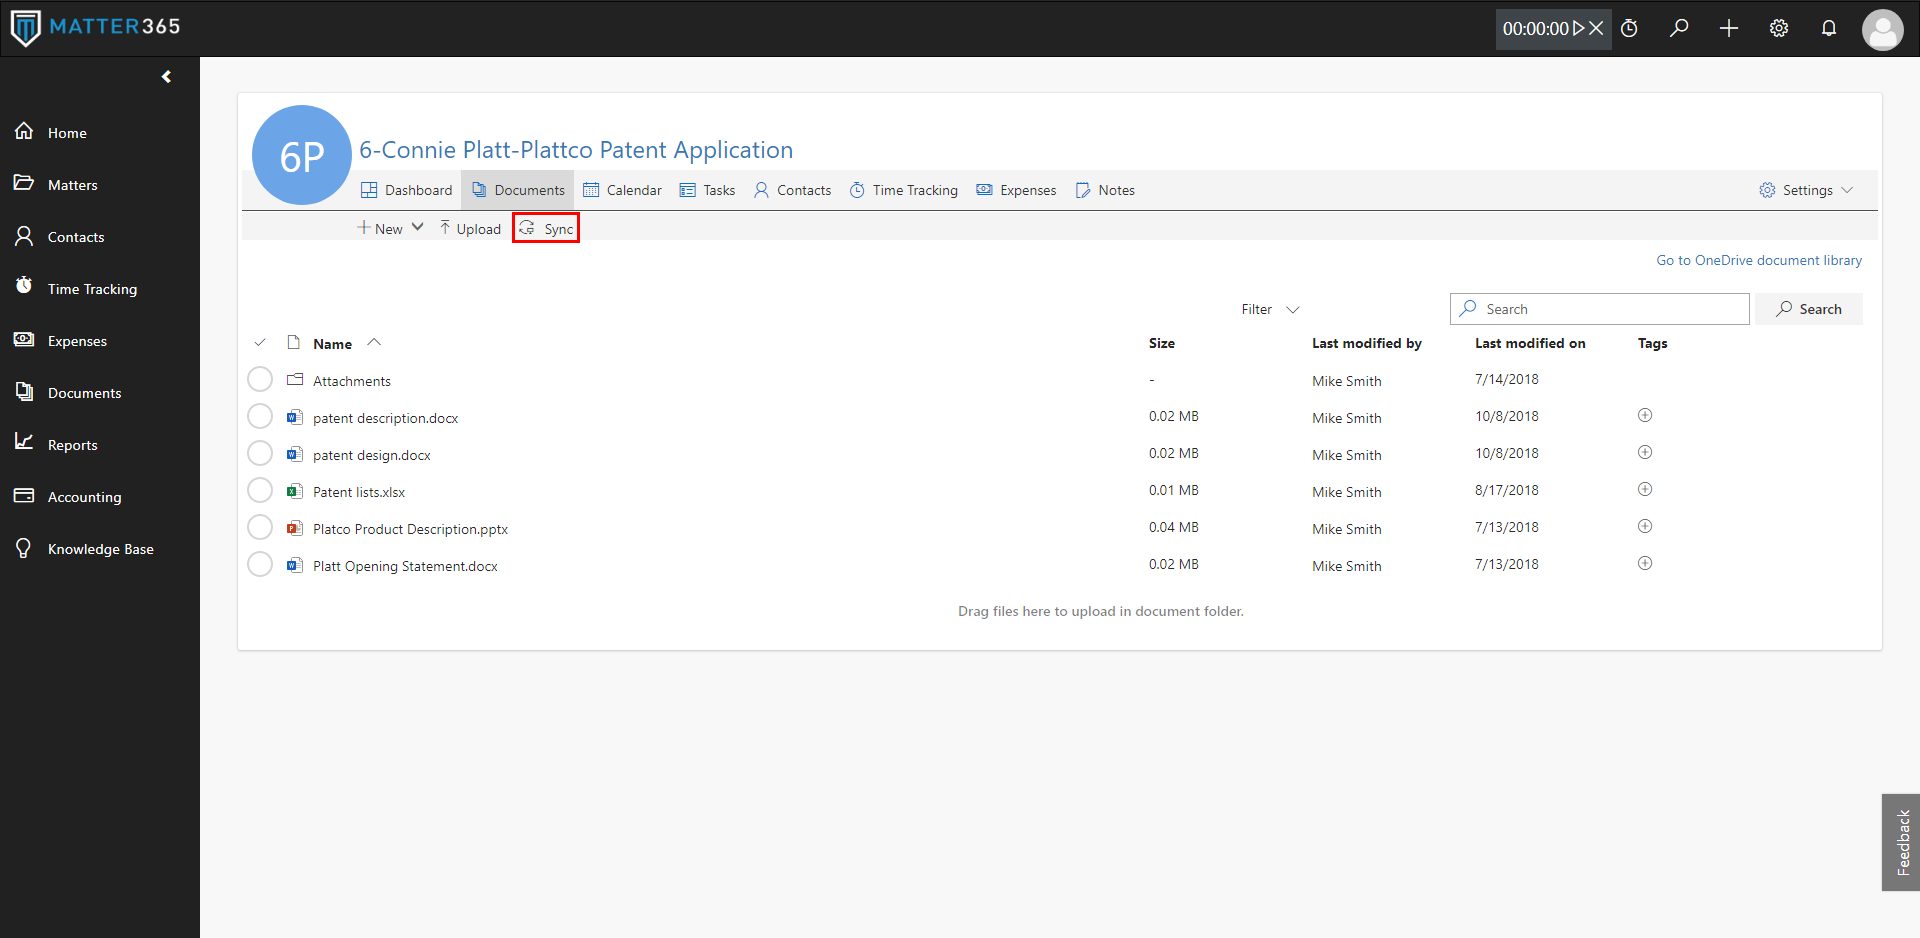 Matter sync to your PC
A folder will be created for your firm in your desktop OneDrive, and sub-folders will be created for each matter that you sync.
After syncing a matter, all future changes online will reflect on your desktop versions of the documents and vice versa.
You will need to be connected to the Internet for the sync to occur. If you make any changes to the documents while off-line, the changes will sync automatically once you are back online.
Working with Outlook
Matter365 also provides a Matter centric approach to email
.
We create an Outlook Group for each Matter. Every Owner and Member of a Matter will have access to these shared “inboxes”.
You can
use the Matte365 Add-in to
save your emails and their attachments to your Matters and keep track of your time without leaving Outlook – both online and desktop.
As a first step, you will need to install Matter365 Outlook add-in. You can find more on how to do it here:
Add-in Installation Guide
 Matter365 Outlook add-in (online version)
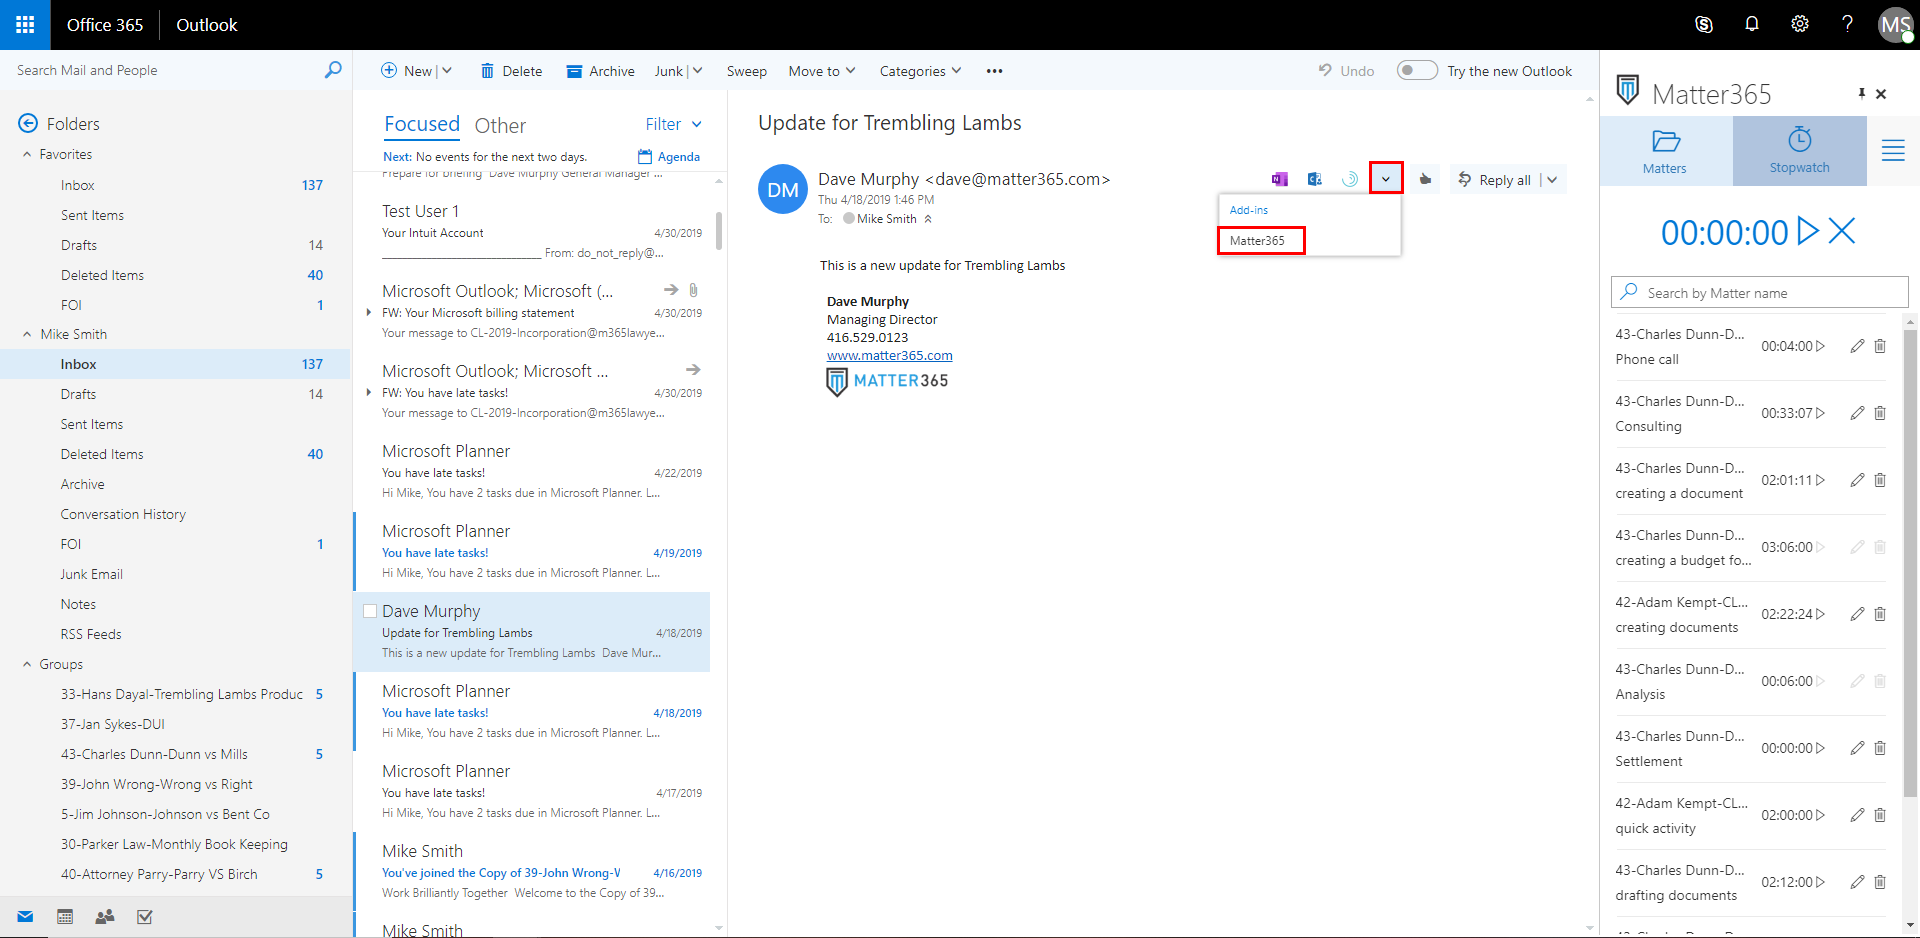
Accessing the add-in
Outlook Online – when you click on an email you will see the Matter365 icon on the upper right side of the window.
Outlook Desktop – Once installed, the Matter365 add-in will appear in the top menu bar
Click on the icon to open the add-in and a sidebar will appear. From here you can start the clock or save emails and attachments to your Matters.
Using the stopwatch
The stopwatch works in the same way as the one in the Matter365 dashboard. Just click the
play button and the clock is started.
Pausing will trigger the “Add activity” form and log your time to a Matter.
You can also re-start a timer on an existing activity in the same manner. All your Matters and associated activities are available under the timer or you can search through them by Matter name.
Email management
You can store one or multiple emails with Matter365 Add-in.
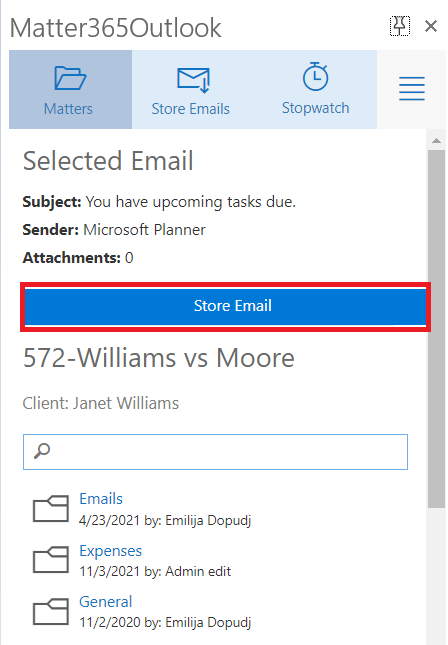
To associate one email to a Matter:
1. Select or open an email
2. Open the Matter365 add-in
3. Select the ''Matters" tab of the add-in
4. Select or search for a Matter where the email will be stored
5. Click on
Store Email to have it forwarded to the Group inbox, folder specific to this Matter.
Any attachments from the email will be automatically uploaded and stored in the Attachment Folder in that Matter’s OneDrive Folder. This will make it immediately accessible for all other embers working on that Matter.
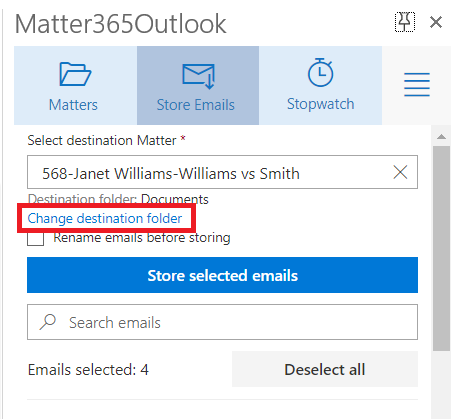
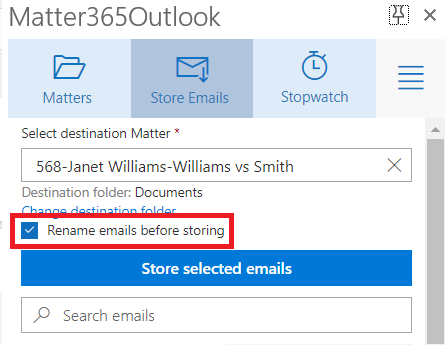
To store multiple emails to a Matter:
1. Click on the "Store Emails" tab in the Matter365 Add-in and select the emails you wish to store:
2. Then click on the "
Select destination Matter" field and select the Matter you wish to store the emails in. You can use this field to search for a Matter:
Before you store the emails you can change the destination folder in which the emails will be stored and you can rename the emails as well.
To change the destination folder (the folder in which the emails will be stored) click on "Change destination folder"
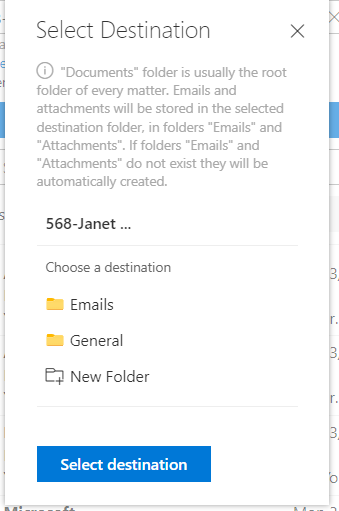
The default Destination folder is the "Documents" folder. If you choose a different folder, Matter365 will create new folders named "Emails" / "Attachments" if those folders don't already exist and store the emails/attachments there.
Select a folder from the list or create a new folder. When you select the desired folder click "Select destination" :
To rename the emails before storing them simply check the "Rename emails before storing" option:
Rename the emails to your liking and click "
Save":
3. Once you have chosen the Destination folder and renamed the emails click "
Store selected emails
"
to have them forwarded to the Group inbox, folder specific to this Matter:
Working with Calendars
Each Matter will have its own Calendar in Outlook. These can be accessed in the left-hand bar of your Calendar. They can be displayed next to or overlaid on your Calendar.
For more information on how to work with Calendars, please see this article:
Matter's Calendar

